Build any workflow
A workflow (also called a pipeline) is a graph of nodes. Data enters at one end, each node does one job and passes a result to the next, and the last node produces the outcome: a record, a message, a report. This guide gives you a method that works for any workflow, then the control-flow patterns you combine to build it. Every pattern below was run on the real engine with synthetic data, and the results shown are what it returned.
- Reference: Workflows builder for every button and panel, and Ports, types and data flow for how data moves between nodes.
- Hands-on first workflow: Your first workflow.
- Complete recipes: HL7 ADT to FHIR and Voice follow-up call.
Is a workflow the right tool?
| You need | Use |
|---|---|
| A fixed sequence of steps with branches, the same every time, that you can test and repeat | A workflow (this guide) |
| One assistant with tools that decides for itself what to call | An agent |
| Several model steps with roles, routing, review loops and an audit trail of every prompt | An agent graph |
A workflow can call agents as a step (the agent-executor node), so you can mix them: fixed plumbing around a model that does the reasoning.
The method

1. Define the job
Before you open the editor, write down five things. Most workflow bugs come from skipping one of them.
| Question | Example (lab-result triage) |
|---|---|
| How does it start? | Someone runs it with a lab result. |
| What data comes in, with which fields and types? | patient_id (text), test (text), value (a number). |
| What decisions does it make? | Is value above 5.5? |
| What leaves, and where does it go? | A high-value record or a routine record; this exercise sends no notification. |
| What happens when a step fails, and who sees it? | The run fails and shows in Tiet · Studio → Workflows → Monitor. |
2. Choose how it starts
The first node decides how the workflow starts. Pick the one that matches the job.
| Start | Node | What it needs | Use it for |
|---|---|---|---|
| Run by hand or API | input | defaults (or data) and required_fields | Anything you start yourself, with values from Run with inputs or the API |
| On a timer | scheduler | schedule_type (interval, once or daily), interval_seconds, execute_at, time_of_day | Recurring jobs. For a cron expression, choose Schedule in the Run menu (it offers cron presets and a custom expression and adds the trigger node), or use Tiet · Studio → Workflows → Monitor → Schedules (see Run options) |
| An HTTP call | api-webhook | port (9090), listen_path, auth_mode (none, header_secret, hmac_sha256), webhook_secret | Another system notifies you |
| A FHIR subscription | fhir-webhook | filter_resource_type, filter_event | React to FHIR resource changes |
| An HL7 message | hl7-listener | listen_port (2575), filters on message type, event, sending application and facility | Hospital interfaces; see the ADT recipe |
| Generic event | trigger | type (manual, webhook, schedule, condition, event) | When none of the above fits |
The input node's output port carries the whole record, so the next node can read every field.
3. Build it in the editor
- Open Tiet · Studio → Workflows and choose New Workflow. A blank editor opens in a tab.
- In the left panel choose Palette. Search by name, id, category, description or port type (the box reads "Search name, type, port, standard…"), or expand a category. Drag the node onto the canvas.
- Select a node. The Inspector on the right shows its settings (Node Settings) and its Ports. Fill in the required ones (marked with a red asterisk). Settings are split into tabs such as Basic and Advanced.
How a setting is entered depends on its type: text and number boxes; drop-downs for fixed choices; on/off switches; a JSON text box for
jsonandanysettings (it turns red and keeps your text as plain text until it parses); a list with Add item for arrays such asrequired_fields; and, fortransformMappings, rows with Target and Source boxes (plus Transform and Default where the node offers them) added with Add field. - Draw an edge from an output port (right side of a node) to an input port (left side) of the next node.
- Put values you reuse (a base URL, a threshold) in Resources (toolbar), on the Variables tab, and reference them as
{{name}}. The same drawer has Connectors, Storage and Test Data tabs.
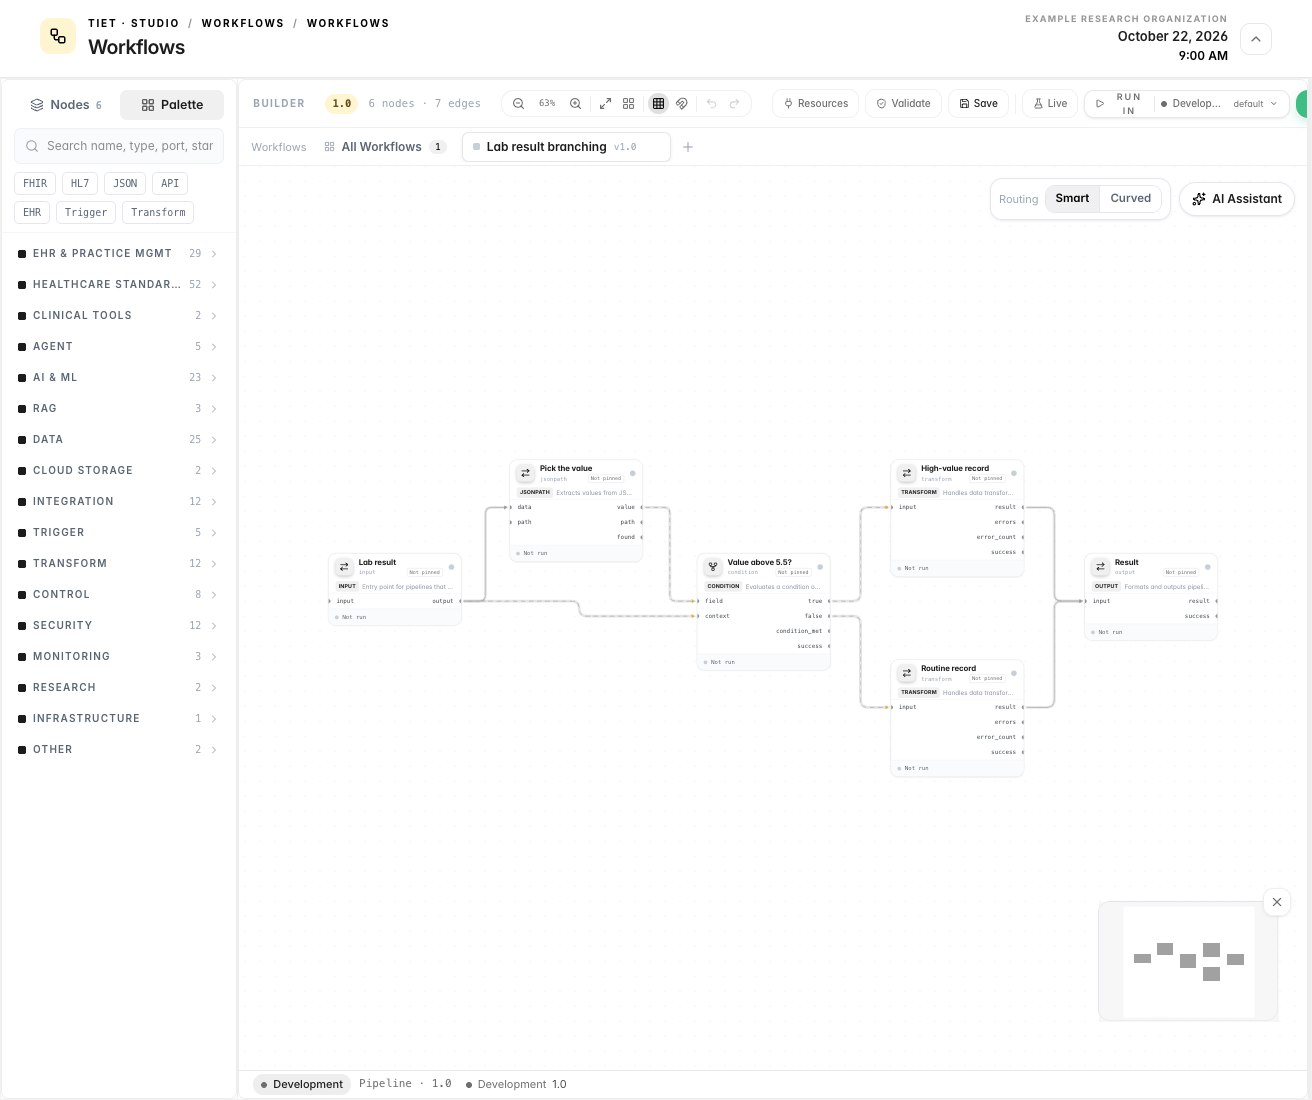
The toolbar, left to right: zoom and layout controls, Resources, Validate, Save, the Live/Test toggle, the Run in environment selector, Run (with an arrow menu) and Deploy. The right panel's tabs are Inspector, Assistant, Diff, Docs and API, and the Routing switch (Smart or Curved) and AI Assistant sit at the top right of the canvas.
Select a node to see exactly what it accepts and produces:
4. Wire the data correctly
Five rules cover most problems. The ports page explains each one with examples.
- An edge connects a port to a port, not a field. If you need one field, a node in between has to pick it out (for example
jsonpath, whosevalueport carries the extracted field). In the editor you can only draw edges between the ports a node declares, so check the ports in the Inspector first. - A
transforminmapmode reads upstream data under the name of the port it was wired to, so its mappings start withinput.(for exampleinput.patient_id). Without the prefix the fields come out empty. - A
conditionnode tests the value on itsfieldport and passes on only its comparison result. Thefieldport must carry the number itself, not a record that contains it (a record fails withvalues must be numeric for > comparison). To carry the record down the chosen branch, wire it to thecontextport and name it inpass_through. - Numeric comparisons need numbers. The text
"6.1"is not a number and fails withvalues must be numeric for > comparison. - A secret variable is not substituted by
{{name}}. It reaches the target as the literal text. Keep secrets in the credential store, and use variables only for values that are safe to see in the workflow.
If an edge uses a port that does not exist on the source node, the run still finishes as completed and the target node is quietly skipped. After every run, scan the nodes for skipped and check that each one is expected.
5. Test, then test again
| Tool | What it tells you |
|---|---|
| Validate | Checks the workflow before you run it. It reports errors only. It does not flag a wrong port name, and port-type mismatches do not turn it red. |
| Run with inputs | Runs with values you type as JSON. Numbers must be JSON numbers. |
| Run in selector | Picks the environment the run executes in. An environment that allows drafts runs what the editor holds; any other runs only what was deployed to it, and the server refuses the rest. |
| Live/Test toggle | The button reads Live (real connectors) or Test (fixtures). In Test mode fixtures and input overrides are applied so nodes use pre-defined data instead of waiting for real events. Dry run in the Run menu is labelled "Run in test mode" but saves and runs exactly like Run; it follows the toggle, so switch to Test first. Do not assume either avoids a real side effect such as a phone call. |
| Debug step-by-step | Pauses at each node. Right-click a node and choose Inspect Data, or select it and open the Diff tab, to see what went in and came out. |
| EXECUTION LOG, STEP DEBUG, TRACE | The bottom panel: per-node status, data, and the span tree of the run. |
Run on mesh is always listed but disabled ("Set a node's Runs-on placement to enable") until at least one node has a Runs on (placement) value; see Run on mesh.
Test the edges of your input, not only the middle: the smallest value, a missing field, a value exactly on a threshold.
6. Save a version and release it
Save (Ctrl/Cmd+S) opens Save New Version, which suggests the next version number; every save is a new version. Save once before the first run: Run, Run with inputs, Dry run and Deploy need a workflow that has been saved once, and afterwards they save your current changes first (without a version prompt). The Deploy menu lists one entry, Deploy vN to <environment>, for every other environment, plus Export as JSON and Export as YAML; its Activate (enable schedule, enable trigger), push and deployment-history entries are shown disabled. Be aware of what Deploy does and does not do, and read Environments and promotion before relying on it for a controlled release.
After release, watch runs in Tiet · Studio → Workflows → Monitor.
Control-flow patterns
Branch on a condition
The condition node tests the value that arrives on its field port and activates either its true port or its false port. Only the nodes wired to the active port run; the others are skipped.

Download the complete JSON definition or YAML definition, plus sample inputs. The full downloads use the builder export format (definition.nodes and definition.connections).
The same branching pattern in abbreviated YAML (edges is the connection alias):
nodes:
  - id: result
    type: input
    config:
      required_fields: [patient_id, test, value]
      defaults: {patient_id: "test-patient-a", test: "potassium", value: 4.2}
  - id: pick-value
    type: jsonpath
    config:
      path: value
  - id: above-threshold
    type: condition
    config:
      field: value
      condition_type: greater_than
      compare_value: 5.5
      pass_through: {record: context}
  - id: high-value
    type: transform
    config:
      transformation_type: map
      mappings: {patient: input.record.patient_id, test: input.record.test, value: input.record.value}
  - id: routine
    type: transform
    config:
      transformation_type: map
      mappings: {patient: input.record.patient_id, test: input.record.test, value: input.record.value}
  - id: out
    type: output
edges:
  - {source_node: result,      source_port: output, target_node: pick-value,   target_port: data}
  - {source_node: pick-value,  source_port: value,  target_node: above-threshold,  target_port: field}
  - {source_node: result,      source_port: output, target_node: above-threshold,  target_port: context}
  - {source_node: above-threshold, source_port: "true",  target_node: high-value,  target_port: input}
  - {source_node: above-threshold, source_port: "false", target_node: routine, target_port: input}
  - {source_node: high-value,  source_port: result, target_node: out, target_port: input}
  - {source_node: routine, source_port: result, target_node: out, target_port: input}
Every edge uses a port the node declares, so you can draw the whole workflow in the editor. Two edges leave the input node: one into pick-value (so the condition gets the bare number on field) and one into the condition's context port (so the whole record can be carried down the chosen branch). Wiring the input node's output straight into field does not work: the port carries the whole record, and the comparison fails with values must be numeric for > comparison. The condition node's field setting (value) names the number being tested; the value that arrives on the field port is the one it compares.
Result of the two runs:
value | Active port | high-value | routine | out receives |
|---|---|---|---|---|
| 4.2 | false | skipped | ran | {patient: "test-patient-a", test: "potassium", value: 4.2} |
| 6.1 | true | ran | skipped | {patient: "test-patient-a", test: "potassium", value: 6.1} |
Both branches feed one out node. The run completes with one branch skipped, so a join after a branch is safe. For more than two outcomes, use the router node (rules, default_route) or chain conditions.
Filter and aggregate a list
Use filter to keep the records that match, then aggregator to count or summarise them.
nodes:
  - id: labs
    type: input
    config:
      defaults:
        data:
          - {patient_id: "pt-a", test: "potassium", value: 4.1}
          - {patient_id: "pt-b", test: "potassium", value: 6.2}
          - {patient_id: "pt-c", test: "potassium", value: 5.9}
          - {patient_id: "pt-d", test: "potassium", value: 3.8}
  - id: critical
    type: filter
    config:
      logic: AND
      conditions:
        - {field: value, operator: greater_than, value: 5.5}
  - id: count
    type: aggregator
    config: {aggregation_type: count}
edges:
  - {source_node: labs,     source_port: data,          target_node: critical, target_port: data}
  - {source_node: critical, source_port: filtered_data, target_node: count,    target_port: data}
The filter node returns filtered_data (the matching records) with filtered_count. Run on the four records above it keeps pt-b and pt-c, and the aggregator returns {"count": 2}.
The aggregator wants an array. Wired from result, it receives the wrapper object and fails with data must be an array. Wire the filtered_data field into its data port.
Filter operators include equals, not_equals, greater_than, less_than, contains, starts_with, regex, in, not_in, exists, is_empty and is_null (and short forms such as gt, ==, >=). aggregation_type can be count, sum, average, min, max, group or distinct.
Combine two sources
Two nodes with no dependency between them run in the same batch, in parallel. Join them with a merge node:
  - id: combine
    type: merge
    config: {merge_type: object, sources: [demographics, vitals]}
edges:
  - {source_node: demographics, source_port: output, target_node: combine, target_port: demographics}
  - {source_node: vitals,       source_port: output, target_node: combine, target_port: vitals}
With demographics = {patient_id: "pt-a", name: "Test Patient A"} and vitals = {heart_rate: 72, spo2: 97}, merge returned merged: {heart_rate: 72, name: "Test Patient A", patient_id: "pt-a", spo2: 97}, field_count: 4 and source_count: 2. merge_type is object, array or concat.
Work through a list
The loop node (loop_type: for_each, while or until) emits a list with an index for each item:
{"count": 2, "results": [{"index": 0, "item": {"patient_id": "pt-a"}}, {"index": 1, "item": {"patient_id": "pt-b"}}]}
The node produces the indexed list once, and the nodes after it run once. It does not repeat the downstream branch for each item. A workflow graph can never contain a cycle (the engine rejects it at compile time). For per-record work use batch (batch_size, parallelism, continue_on_error) or do the work inside a node that accepts a list.
Handle failure on purpose
By default a failed node fails the run (fail_fast). You can change that for one node with error_handling, and you can retry transient errors with retry.

  - id: write
    type: fhir-crud
    config: {operation: transaction, fhir_url: "{{FHIR_URL}}"}
    error_handling: {strategy: log_and_continue}   # fail_fast (default), log_and_continue, fallback
    retry: {max_retries: 3, initial_delay_ms: 500, backoff_factor: 2, jitter: true}
  - id: report
    type: output
    accept_outcomes: [succeeded, degraded]          # needed to run after a degraded node
In the test, write failed at run time because it was handed something that was not a Bundle. What the engine did:
| Setting | Result |
|---|---|
fail_fast | write failed with transaction input must be a Bundle, got resourceType=<nil>, and the run ended failed. |
log_and_continue, next node without accept_outcomes | write completed with outcome degraded and empty outputs, and the next node failed: node after requires a successful outcome from bad (received degraded). |
log_and_continue, next node with accept_outcomes: [succeeded, degraded] | The next node ran, and the run finished partial. |
Use log_and_continue only where the rest of the workflow can truly proceed without that step's output, and make the later node handle the missing data. A run that ends partial is not a success: monitor for it.
Other control nodes: validator (rules, strict_mode; with strict_mode off a failing record passes through with valid=false), error-handler (strategy: catch, fallback, transform, retry_info) and delay.
Before you rely on a workflow
- Every required field has a value, and the exact node ids come from the palette.
- You ran it with a normal input, an edge-case input and a missing-field input.
- No node shows skipped unless you expected it.
- Numbers are numbers, and no secret sits in a variable.
- Failure handling is deliberate: you know what a
degradedorpartialrun means for the next step. - Anything that writes to a clinical system writes proposals or drafts, not final records, unless a person reviews them. See Agents and governance.
- You tested with synthetic data only.
When it does not work
| Symptom | Likely cause | Fix |
|---|---|---|
| A node shows skipped. | Its incoming edge is on a condition port that was not active, or a port name on an edge is wrong. | Check the source port name on the edge (true or false for a condition). |
A mapped field is null. | The mapping lacks the port-name prefix. | Use input.<field>. |
values must be numeric for > comparison | A text value reached a numeric comparison. | Supply a number. |
data must be an array | A list node received its wrapper object. | Wire the list field (for example filtered_data). |
compilation failed: node release xyz@ is unavailable | The node id is not in the catalog. | Copy the id from the palette. |
compilation failed: ... circular dependency detected | The graph has a cycle. | Remove the edge that loops back. |
node ... validation failed: <field> is required | A required setting is empty. | Fill it in the Inspector. |
requires a successful outcome from <node> (received degraded) | The node before ended degraded under log_and_continue. | Add accept_outcomes to this node, or stop using log_and_continue on the earlier one. |
The run is partial. | At least one node ended degraded. | Open the run in Monitor and check which one. |
More errors, with the data-flow ones in detail, are in Ports, types and data flow.
Where next
- Your first workflow: build the triage workflow step by step in the editor.
- Recipe: HL7 ADT to FHIR: a workflow that receives hospital messages.
- Build an agent graph and Create an agent: when a step needs a model that reasons.
- Workflows builder: the full reference.
Something unclear? Send documentation feedback by email.